
Disclosure: As an Amazon Associate, I earn from qualifying purchases.
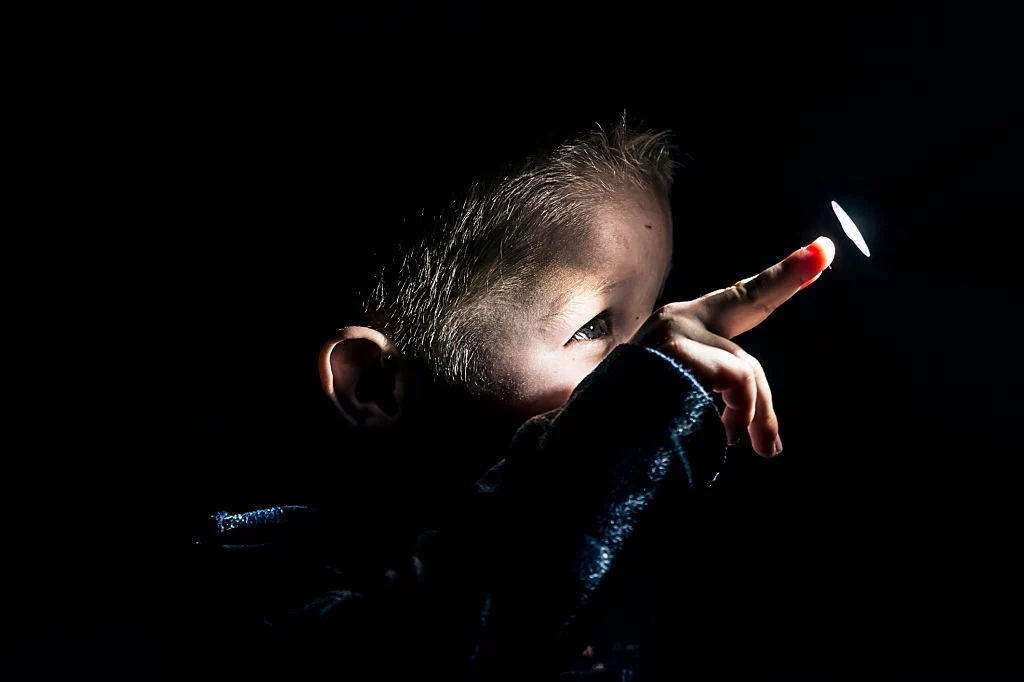
Photography doesn’t always happen under perfect sunlight. Some of the most breathtaking images are taken in dimly lit environments, city streets at night, candle-lit dinners, or moody indoor portraits. But shooting in low light can feel overwhelming, especially for beginners. Grainy images, motion blur, or dark shadows are common frustrations.
The good news? With the right techniques, camera settings, and gear, you can capture stunning photos even in challenging lighting conditions. This guide will walk you through everything you need to know, from essential gear to beginner-friendly portrait photography tips.
Why Low Light Photography Is Challenging
Low-light photography tests your skills as a photographer because your camera struggles to capture enough light. The main challenges include:
- Noise (graininess): Higher ISO levels add brightness but also introduce noise.
- Motion blur: Longer shutter speeds let in more light but risk blurring moving subjects.
- Focus issues: Cameras often hunt for focus in dim conditions.
Understanding these challenges is the first step to overcoming them. By learning to balance the exposure triangle aperture, shutter speed, and ISO, you can unlock the secrets of beautiful low-light images.
Recommended Gear for Low Light Photography
While skill is more important than gear, the right equipment makes a noticeable difference. Here are essentials worth considering:
1. A Camera with Strong Low-Light Performance
Look for cameras that perform well at higher ISO levels. For example:
Canon EOS Rebel SL3 / EOS 250D

- 24.1MP APS-C sensor
- 4K video recording
- Vari-angle touchscreen
- Beginner-friendly guided interface
Affiliate Link: Canon EOS Rebel SL3 Digital SLR Camera
Nikon is, however, a bit more technical in design. That said, Nikons have massive power and control once the initial learning curve has passed.
Nikon D3500
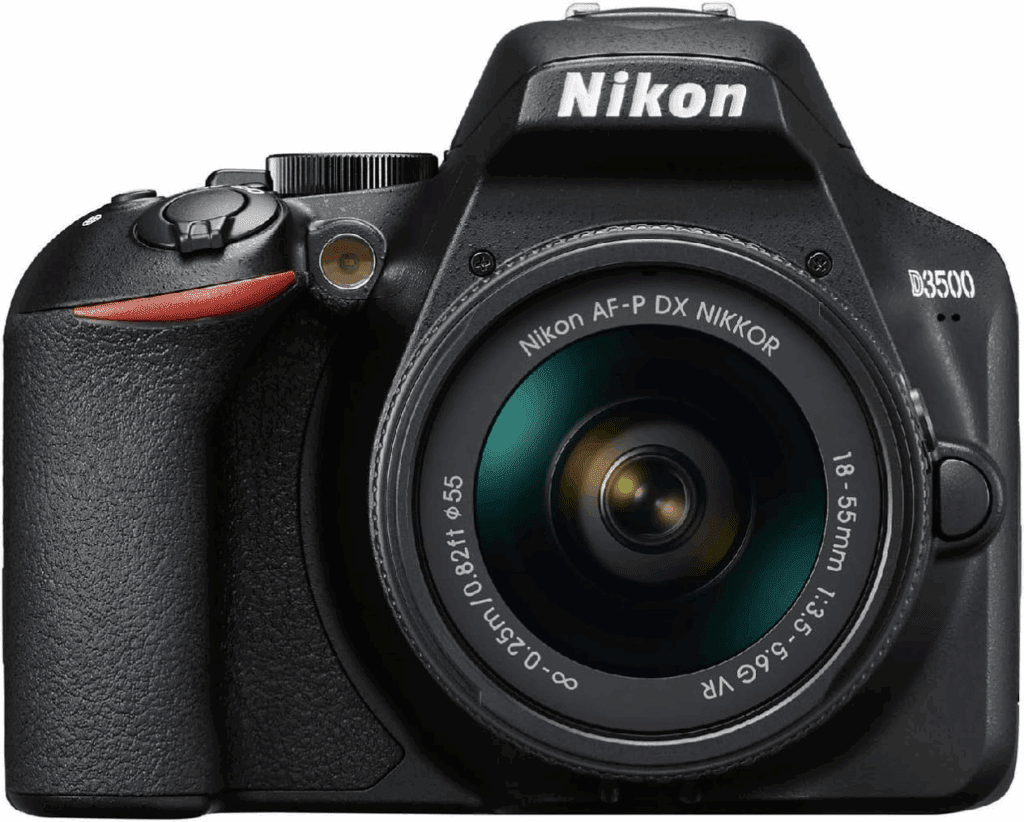
- 24.2MP APS-C sensor
- Excellent image quality
- Long battery life
- Simple Guide Mode for beginners
Affiliate Link: Nikon D3500 24.2MP DSLR Camera + AF-P DX 18-55mm VR NIKKOR Lens Kit + TRD ® 20 Piece Digital Essential Kit
Nikon Z50
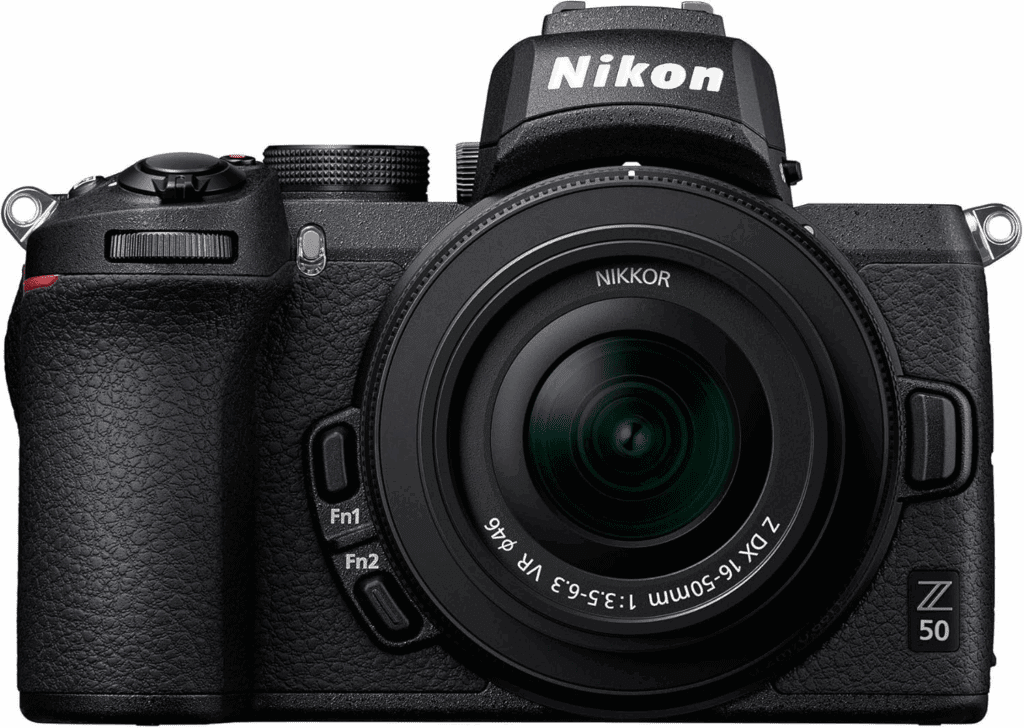
- 4K UHD video
- Eye-detection AF
- Compact and light
- Flip-down screen (less ideal for tripod use)
Affiliate Link: Nikon Z 30 + 16-50mm F/3.5-6.3 VR kit with Wide-Angle Zoom Lens (mirrorless stills/video camera) Black
Verdict: Canon is victorious in vlogging and YouTube because of the better autofocus and screen structure.
2. Fast Lenses
A lens with a wide aperture (like f/1.4 or f/1.8) allows more light into the sensor and creates that dreamy blurred background effect.
- Canon EF 50mm f/1.8 STM – Perfect for portraits with shallow depth of field.
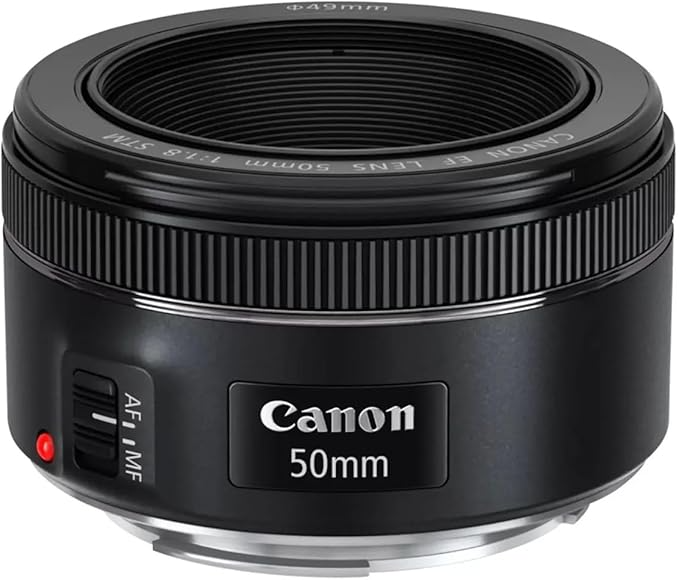
Affiliate Link: Canon EF 50mm f/1.8 STM Lens
- Sigma 35mm f/1.4 DG HSM Art – Great for both portraits and street photography.
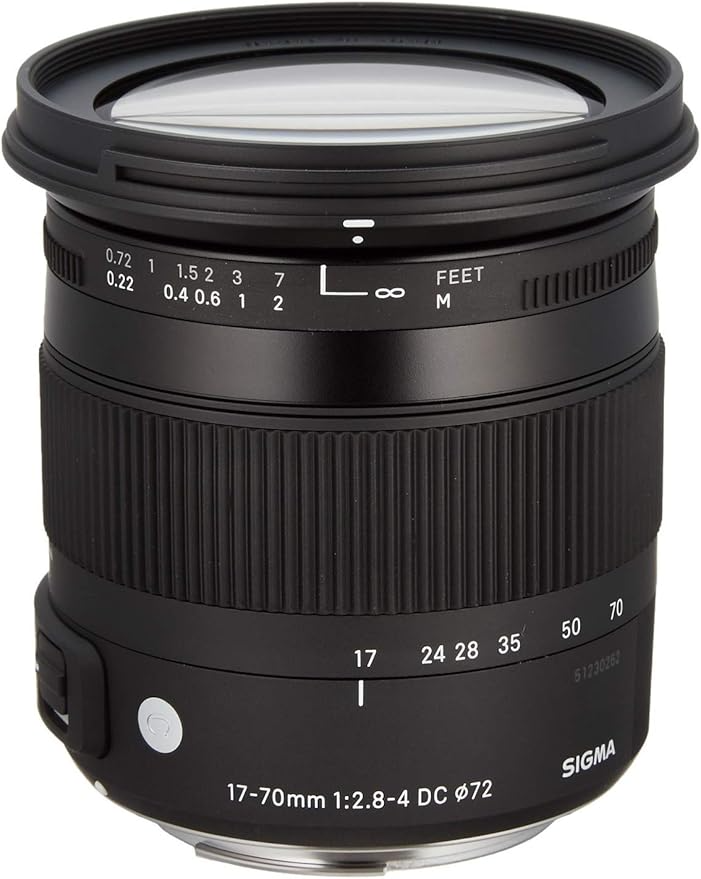
Affiliate Link: Sigma 17-70mm F2.8-4 Contemporary DC Macro OS HSM Lens for Nikon Black
3. Tripods
Stability is crucial in low light. A tripod helps eliminate motion blur.
- Manfrotto Befree Advanced (Aluminium)
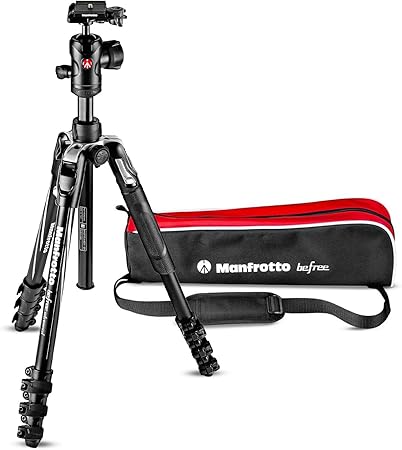
Manfrotto Befree Advanced is the most popular among the travel tripods used by photographers who desire a compact size without compromising on stability. It can be folded small enough to fit a backpack and has fast leg locks and a solid ball head that takes DSLR and mirrorless bodies with medium telephoto lenses with ease. The aluminium variant is durable, and it is cheaper compared to carbon options, whilst maintaining a large payload on most kits. The ideal photographer and vlogger should use it because it is a dependable, no-frills tripod.
Affiliate Link: Manfrotto Befree Advanced Camera Tripod with Lever Closure, Portable and Compact Travel Tripod Kit with Ball Head, Aluminum Tripod for DSLR Reflex and Mirrorless Cameras, Camera Accessories
- Peak Design Travel Tripod (Carbon)
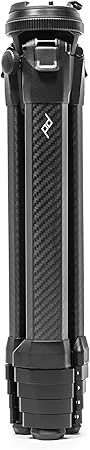
The Travel Tripod (carbon fibre model) by Peak Design is a combination of a very compact folded size and the best stiffness and finish in the class. It folds down to a size approximately the size of a water bottle, but reaches full working height with landscapes and tripod-mounted video rigs. Meanwhile, the construction is built to have a small footprint without impacting on payload, and it can thus be a good option for serious travel photographers and content creators who often bring equipment on planes. It is a first choice when it comes to a high-quality travel tripod that does not make a sound when being transported, yet stays steady when taking photos.
Why it stands out
- Outstanding miniaturisation and design
- Excellent balance of weight against the stability of the carbon-fibre construct
Affiliate Link: Peak Design Travel Tripod, Carbon Fiber, Compact Design, Quick Setup and Takedown, Pro-Level Stability, Ergonomic Ball Head, Compact and Portable Travel Tripod for Camera and Phone, 20 lb Capacity
- Benro Mach3 TMA37AL
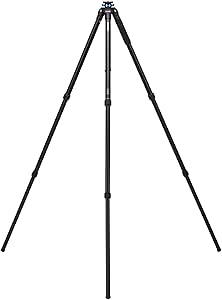
The Benro Mach3 TMA37AL can be used by photographers to provide high load support when using heavy bodies of DSLRs and long lenses without the high cost of more expensive pro tripods. It has high performance twist locks, rugged aluminium legs, and a design that fits both in studio and outdoor applications. Provided that you wear heavier lenses or sometimes you take your camera outside and have to work on uneven surfaces, this model can be regarded as durable, and with a certain degree of reassurance.
Highlights
- High load-bearing and level platform
- Twist-lock legs to set up quickly
Affiliate Link: Benro Mach3 3 Series Aluminum Tripod (TMA37AL)
4. Lighting Accessories
Sometimes, adding just a bit of light transforms your shot.
ULANZI VL-81 3000mAh Bi-Color LED

Video Light w Softbox – 3200K-5600K+CRI95 Rechargeable Camera Light, 3 Cold Shoe Mount for DSLR/GoPro/Sony/Canon/iPhone, Vlog Filming TikTok Live & Photography
Best Camera Settings for Low Light Photography
Your camera settings play a huge role in getting sharp, well-lit images.
1. Aperture: Wide Open
Use the lowest f-stop your lens allows (e.g., f/1.8 or f/2.8). This not only lets in more light but also creates that beautiful background blur many beginners dream of. If you’re wondering how to take portrait photos with a blurred background, opening up your aperture is the key.
2. Shutter Speed: Balance Light and Motion
Slower shutter speeds let in more light but risk motion blur. A good rule of thumb: never let your shutter speed go below the focal length of your lens (e.g., 1/50s for a 50mm lens) unless you’re using a tripod.
3. ISO: Push Carefully
Raising ISO brightens your image but introduces noise. Modern cameras handle ISO 1600–3200 well, so experiment within this range.
4. White Balance
Set white balance to match your light source: tungsten, fluorescent, or daylight. This ensures natural-looking colors.
For more guidance, explore our Beginner’s Guide to Portrait Photography Camera Settings.
Techniques to Improve Low Light Photography
- Use available light creatively: Position your subject near windows, candles, or street lamps.
- Stabilize your camera: Use a tripod or brace against a wall.
- Shoot in RAW: Gives you more flexibility to fix exposure and noise during editing.
- Experiment with exposure compensation: Slightly overexposing can help in darker scenes.
Creative Approaches for Stunning Low-Light Shots
Low light doesn’t have to be a limitation; it’s a chance for creativity.
- Shallow depth of field photography: Use wide apertures (f/1.4–f/2.8) for dreamy portraits where the subject pops against a blurred background.
- Play with bokeh: City lights or fairy lights make beautiful background blur effects.
- Silhouettes: Position your subject against a brighter light source for dramatic silhouettes.
- Mix light sources: Blend natural light with artificial lights for unique moods.
Portrait Photography Tips for Beginners
If you’re just starting, here are some portrait photography tips for beginners in low light:
- Focus on the eyes: Always keep your subject’s eyes sharp.
- Avoid harsh direct light: Use softer sources like lamps or bounced flash.
- Direct your subject: Simple posing can make a big difference.
- Shoot multiple frames: Low light increases the chance of blur, so take several shots.
Post-Processing for Low Light Photos
Even the best photographers rely on editing to perfect low-light images.
- Noise reduction: Tools in Lightroom and Photoshop can reduce grain.
- Enhance shadows and highlights: Bring out hidden details without overexposing.
- Adjust white balance: Correct color casts from artificial lights.
- Sharpen selectively: Focus sharpening on the eyes and main details.
FAQs About Low Light & Portrait Photography
Q1: What is the best ISO for low-light photography?
There’s no single “best” ISO. Start at ISO 800 and increase as needed while balancing noise levels.
Q2: How do I reduce noise in low-light photos?
Use a lower ISO when possible, shoot in RAW format, and apply noise reduction in post-processing.
Q3: What lens is best for portraits in low light?
Fast prime lenses, such as a 50mm f/1.8 or 85mm f/1.4, are excellent choices.
Q4: Can smartphones take good low-light photos?
Yes! Modern smartphones with Night Mode can capture impressive results, but a dedicated camera with a fast lens will always give you more control.
Final Thoughts
Low-light photography is challenging, but with practice, the right settings, and the right gear, you can capture breathtaking images. Remember to experiment, learn from mistakes, and most importantly, enjoy the process.
Looking for the best cameras, lenses, and gear for your low-light photography journey?
Explore our CameraVibe Photography Gear Guides for detailed reviews and recommendations.